
Printing a Disc Label from a Computer
This section describes how to print photos on a printable disc with Easy-PhotoPrint Editor.
![]() Important
Important
-
Do not mount the multi-purpose tray until the message prompting you to load the printable disc appears. Doing so can damage the printer.
-
Start Easy-PhotoPrint Editor.
For Windows:
The procedure below is for a computer running the Windows 10 operating system.
From the Start menu, select (All apps >) Canon Utilities > Easy-PhotoPrint Editor.
For macOS:
From the Go menu in Finder, select Application and double-click the Canon Utilities folder, the Easy-PhotoPrint Editor folder, and then the Easy-PhotoPrint Editor icon.
-
Click Disc Labels icon (A).

-
Select template (B).

-
Select type of printable disc (C) and select Next (D).

-
Click Browse (E) in From computer: and select folder with photos you want to print.

-
Click photos (F) you want to print and select Open (G).

-
Edit disc label and select Next (H).
You can change the background or add texts.

-
Open operation panel (I) until horizontal.

-
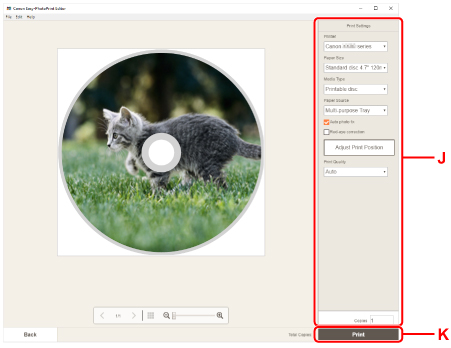
Specify number of copies and other options under Print Settings (J).
For Windows:
Specify the number of copies, your printer name, and other options.
For macOS:
Specify the number of copies and other options.
-
Start printing.
For Windows:
Click Print (K).
For macOS:
Click Next. When the Print dialog appears, specify your model name and other options, and then click Print.
-
When message prompting you to load printable disc appears on printer's touch screen, remove cassette from printer and then detach multi-purpose tray from back of cassette.
Insert the removed cassette back into the printer.


-
Open multi-purpose tray guide (L) and completely press it down.

-
Place printable disc on multi-purpose tray.
-
WITH PRINT SIDE FACING UP, place printable disc, and press it against lock (M) at bottom.

-
While pressing down lock with printable disc, insert top of printable disc into slits (N).

-
-
Place multi-purpose tray on multi-purpose tray guide.

-
Insert multi-purpose tray straight in in horizontal direction until arrow (
 ) on multi-purpose tray guide is approximately aligned with arrow (
 ) on multi-purpose tray.
-
Select OK on printer's touch screen.
The multi-purpose tray is drawn into the printer and printing will start.
-
After printing is complete, pull multi-purpose tray from printer to remove it.

-
While pressing down lock (M), take out printable disc from slits (N) on multi-purpose tray, and remove it.

![]() Note
Note
-
Easy-PhotoPrint Editor enables you to print photos onto the disc label with various layouts.
